How to Make Glow in the Dark Bubbles for Kids

Keeping kids entertained is no easy feat, especially when you’re having to spend more time at home. You can always turn to technology to help when needed, but if you are looking for activities to do with your children that doesn’t involve a screen, it can be difficult to keep their attention. Activities that are both fun and educational can be hard to come by, but we are here with plenty of resources to help keep the entire family entertained. In fact, today’s DIY activity is one that we think the entire family will love: How to make glow in the dark bubbles!
You read that right! As it turns out, it is pretty fun and easy to create some glow in the dark bubbles that will be so much fun to play within the dark.
You don’t need a lot of materials, and in fact, you might already have everything you need laying around the house.
How to Make Glow in the Dark Bubbles Tutorials
1. Method One: Glow Sticks
This first method relies on glow sticks to get your bubbles to glow. While it is safe to do this with children, you will definitely want to do the majority of the mixing unless your children are a bit older. Best of all, the bubbles won’t stain your clothes! We recommend wearing clothes you don’t care about just in case (isn’t that always a good idea when playing with your kids?) but rest assured that this isn’t a recipe that will cause staining.
Here’s what you need:
- Glow sticks (how many you need depends on how much you want to make. We recommend finding non-toxic glow sticks since you will be working with the liquid inside of them).
- Clear container (for storing the glowing bubble liquid)
- Bubble wands (we recommend having a few wands so that numerous people can be blowing bubbles at once)
- Bubble liquid (you can either purchase this or make your own! Quick recipe will be included below)
- Scissors (for getting into the glow sticks)
Here’s what you need to do:
✓ Cut off the ends of the glow sticks and pour the liquid contents into your clear container. We highly recommend that you do this so that your child doesn’t accidentally cut themselves. We also recommend doing this over a sink or over some paper towels in case of any of the liquid spills. For this amount, we recommend 5 glow sticks.
✓ Add in your bubble solution. If you need to make your own, simply combine around 4 and a half cups of water with half a cup of dish soap and 4 tablespoons of glycerin). Whichever liquid you use (store-bought or DIY), you want to end up with 5 cups that you will add to your clear container.
✓ Mix both parts together well! That’s it! Take your bubble wands and start blowing bubbles.
✓ Alternatively, you could also get mini bubble containers that have wand lids so that each person can have their own contained glow bubble mixture.
✓ You can use a blacklight if you have one, but you don’t need one! Turn out the lights and see the bubble solution glow!
2. Method Two: Highlighters
 Believe it or not, you can actually use highlighters to get your bubbles to glow! We love this method because you are far more likely to have some highlighters laying around compared to glow sticks. However, you will need a black light for this method, so if you don’t have one, you will need to purchase one so that you can see the glow.
Here’s what you need:
- Bubble liquid (same as before, you can either purchase some, or create your own mixture by combining dish soap, water, and glycerin)
- Highlighters (make sure you get ones that will glow – some colors do not, we recommend testing with your black light before moving forward. Use the highlighter on paper, turn on the blacklight, and see if the ink glows)
- Pliers (to break open the highlighters)
- Blacklight (to see your finished product!)
✓ Break open your highlighters with your pliers. Again, this step is one we highly recommend you do so that your child or children do not injure themselves. Once you open the highlighter, you will find the ink tube that you can take out to use.
✓ Add the highlighter ink tubes to your bubble solution and shake the container if it has a lid, or alternatively just leave the mixture to sit there. The ink will need some time in order to come out of the tube and mix it with the bubble liquid. You will need it to sit for at least a day, if not more.
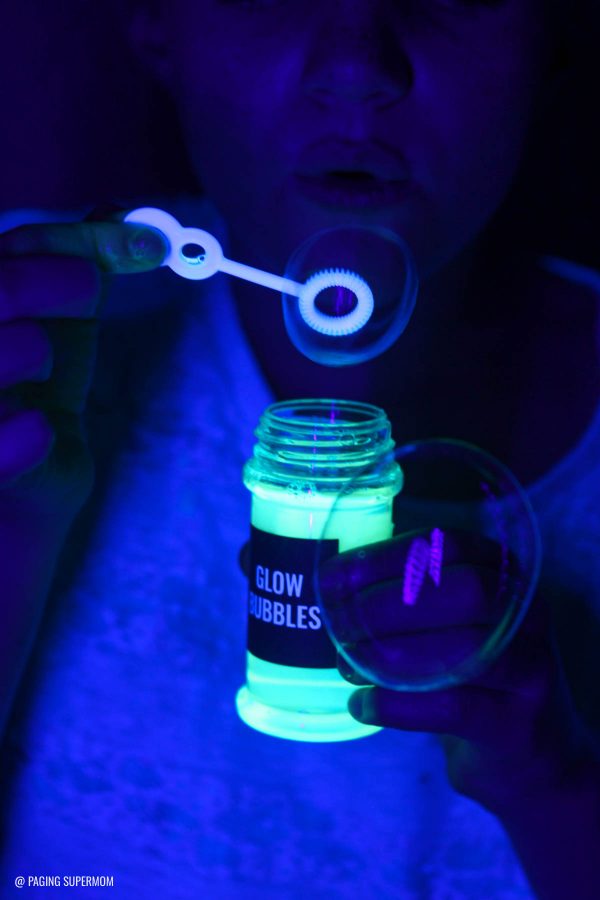
✓ Once the ink has successfully incorporated with the bubble liquid, it’s time to turn on the blacklight and start blowing your bubbles!
We recommend you add the tubes to the bubble liquid on your own and store the bubbles for a few days. At that point, you can tell your kids what you have done so that they can play with the bubbles right away. Thankfully, adding the tubes to the liquid should just take a few minutes.
Wrapping Up
There you have it! Turns out, making glow in the dark bubbles is actually incredibly easy, but trust us, the fun your entire family will have will be out of this world! Sometimes, simple DIY activities can end up being the most fun. We think this is one of those such activities. Enjoy!
Sources:
DIY Glow in the Dark Bubbles
Blacklight Party DIY Glow Bubbles Recipe