How to Build a Catapult for Kids: Free Tutorials!

Catapults are an awesome, fun activity that you should definitely put together with your kids. There are several ways that you can make your catapult at home with simple items that you might already have laying around the house! Here are some of our favorite tutorials on how to make a catapult for kids that you can check out and copy at home with your kids!
Looking to have some fun activities with the kids? We are all looking for some unique, fun activities to put together so that we can spend time at home, have fun, and learn something! Oftentimes, finding activities that are both educational and fun is quite the challenge. Don’t you agree? Keeping your children’s’ attention is difficult on any given day, but when you add in that something is educational, it can get even harder, especially after a long school day or during the summer when kids just want to relax.
However, setting up the entertaining, educational activities with your kids is so important! The more you make learning a fun experience, the more they will be excited to go back to school and learn even more. STEM activities in particular are a great way to get your kids excited about science, technology, engineering, and math! Best of all, these types of activities get your kids off their screens! While kid’s tablets and smartphones have so many wonderful purposes and help us to stay connected, it’s also important to step away from them from time to time.
One such activity that is STEM-based, educational, and just plain fun? DIY catapults! Who doesn’t enjoy playing with a catapult? While it’s fun on its own, but creating the catapult first, you are adding in the educational element as well. And trust us, putting it together can be just as fun as playing with it once it’s completed!
Method 1: With Popsicle Sticks
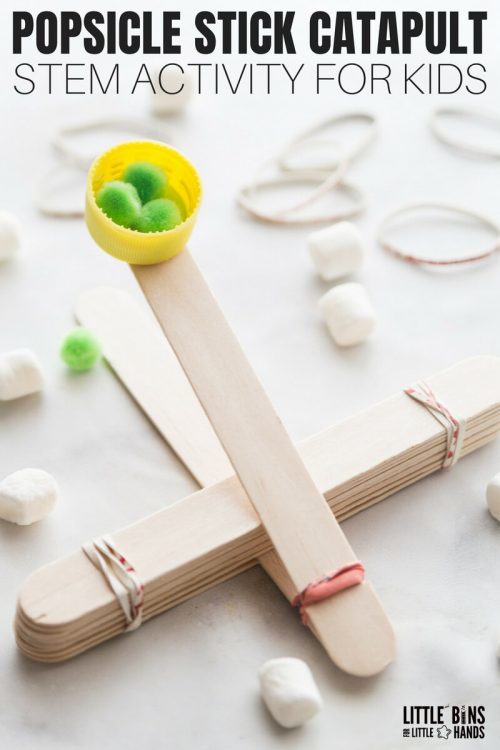 This is pretty much the classic DIY catapult design. Who knew popsicle sticks could work so well? What you need for this project is about 10 popsicle sticks (the bigger the better, not the small thin ones), some rubber bands, and a bottle cap. Plus whatever you want to launch from your catapult, of course!
For this version, you will band together your popsicle sticks to make your catapult. You will need to use scissors to cut small notches on two of the popsicle sticks, so make sure you do that instead of your kids so that they don’t get hurt. The notches will help the rubber bands stay in place for the launch part of the catapult.
The other 8 popsicle sticks get tied together with rubber bands on either end so that they stay together. One of the notched sticks will get pushed through the popsicle sticks – push it directly under the first popsicle stick in the stack. Flip over, then place the second notched popsicle stick on top and attach with rubber bands (the notches will keep them in place). The end of the popsicle stick is your launch area, and that’s where you attach your bottle cap! Use some glue to attach. Now it’s time to launch!
Method 2: With Pool Noodles
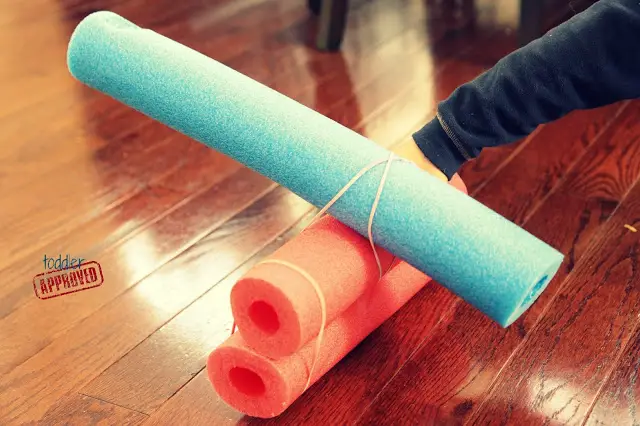 Pool noodles – they’re not just for the pool anymore! This is a great mini catapult version that you can create and use outside – perfect for when the weather is nice and you want to get some fresh air! This also happens to be incredibly easy to put together. All you need are some rubber bands, two pool noodles, a knife, and whatever you will be launching.
You first need to cut your pool noodles in half. Take two of the halves and attach them with rubber bands – one on top of the other. Take another half and attach it as your launch. This one will be perpendicular to the stack you created and attached with another two rubber bands. Before attaching you might want to cut out your launch area – this is where you’ll need the knife again to cut a small indented area where you can place your items you will be launching.
Make sure when you go to launch that you hold both parts of the catapult down – otherwise they might slip. That’s it! Grab your pom-poms or marshmallows or whatever you are launching and have fun! Which item can you launch the farthest?
Method 3: With a Wooden Spoon and Paper Towel Tubes
 Got some empty paper towel tubes laying around? Save them! These make for a great base for this version of a catapult. Hopefully, you are already teaching your kids about recycling, and now you can also teach them about upcycling!
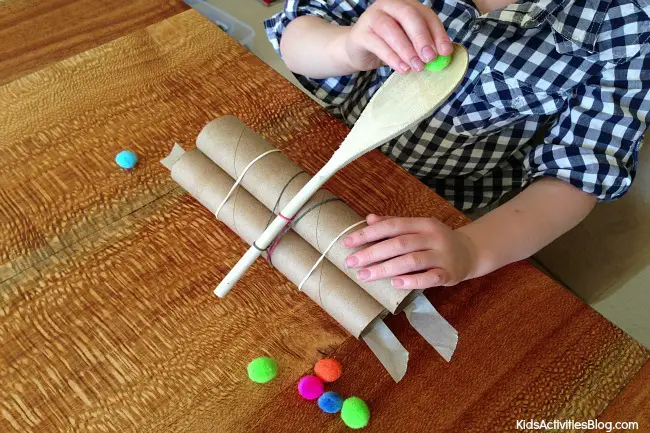
This particular design calls for 3 cardboard tubes (pull some out of your recycling or be sure to save future ones when you finish a roll of paper towels), a wooden spoon, and about 4 rubber bands. This is probably one of the easiest catapults for kids that rely on items that you more than likely already have at home. Don’t forget to gather the items that you want to launch!
To make this particular kid catapult, simply create a triangle stack of your three paper towel tubes with two on the bottom and one on top between the two. Secure on either end with your rubber bands. Next, take an additional rubber band to secure the wooden spoon. The band should wrap around all three tubes and then twist to also wrap around the handle of the spoon in order to secure in place. Finally, secure with one additional rubber band that goes first around the spoon and then loops around the three paper towel tubes.
When launching items from the spoon be sure to hold the paper towel tubes in place. Alternatively, you could if you want additional support so that you can just focus on the most important part: Launching your items!
Method 4: With Marshmallows and Wooden Skewers
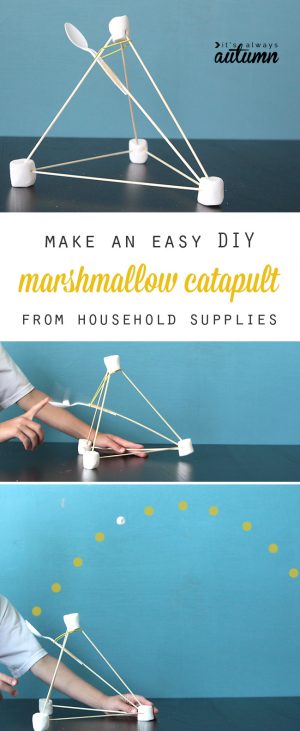 This next catapult for kids is super fun and involves a bit more work to set up the actual catapult. If you really want to make this an educational activity (as well as one that is super fun) this is a great option! With marshmallows and bamboo skewers your kids can build the main structure of the catapult. For this design, a plastic spoon makes for the perfect launch device.
You can either stick with a more simple design, which is perfect if you have younger kids, or let older kids get creative and see if they can create something that is sturdier or more powerful. Like with all the catapults, make sure you put them to the test to see which design works best, as well as which items travel the farthest!
We also like that this catapult can rely on old, stale marshmallows that you would typically just throw away. Have some fun with them first before getting rid of them- another great example of making use of items for other reasons instead of just throwing them away!
Method 5: With Pencils
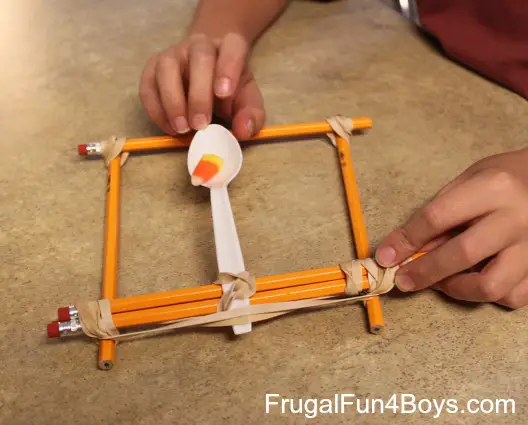 Finally, gold old fashioned wooden pencils also make for great tools for building your perfect catapult. This is another incredibly easy design that doesn’t need a lot of materials. All you need are some unsharpened pencils, some rubber bands, a plastic spoon, and whatever you want to launch.
A square design seems to work well with this particular catapult. Attach the your kid’s pencils in a square space, tying rubber bands on the corners to secure the pencils in place. On the main edge where the plastic spoon will go, attach three pencils instead of one to make it more sturdy. Tie some rubber bands in the center and stick the spoon handle into the rubber bands so that it fits securely. Then you launch!
This is another fun catapult for kids design that you can try to create in different designs to see if one works better than the others. What about adding more pencils, or creating a triangle-shaped design instead of a square? Because there is no glue involved it’s easy to create this catapult in numerous different ways from your same supplies.
Wrapping Up
Whether you make a larger catapult from some old pool noodles, or stick with a mini catapult made of pencils, or anything in between, you can be sure to have a blast launching items and seeing how far they travel!
To make this even more fun we recommend having each of your kids guess how far various items will travel in their DIY catapult. Test out things like small buttons, marshmallows, bottle caps, pom poms, even baby cereal! Whatever small items you can find (that won’t damage or break anything!) is great for your catapult. This also helps to continue the educational process as your kids guess how far items of different sizes and weights will travel. They won’t even realize how much they are learning!
Which catapult on this list looks like the most fun? Let us know which design you go with, and be sure to have fun!